| Help TOC > DEXlib > CVS access guide
|
| CVS access guide |
Date: 2008/02/26 10:05:29
Revision: 1.9
|
DEXlib and STEPmod are developed on Sourceforge.net. Sourceforge.net is a
free Open Source software and standards development website.
This page provides instructions about which actions should be performed in
order to gain access to DEXlib and STEPmod on Sourceforge.net. This is done
in two different ways depending on if you are a developer who needs to update
information, or if you are a non-developer who only wishes to download and read it.
Each file can also be accessed individually from the CVS section of DEXlib
(http://cvs.sourceforge.net/viewcvs.py/dexlib/)
and STEPmod
(http://cvs.sourceforge.net/viewcvs.py/dexlib/)
with only a web browser, without following the instructions below.
As an OASIS PLCS TC member, you can also dowload an HTML-version of DEXlib and STEPmod.
A link to the downloadsite is found on the OASIS PLCS TC website;
(http://www.oasis-open.org/committees/tc_home.php?wg_abbrev=plcs)
The guidence provided here is build from a number of preavious documents, but
the majority is extracted from a help guide created by Mike Ward, Eurostep ltd. If
you encounter problems following this guide, contact anyone of the DEXlib
developers.
This section explains the actions you need to take in order to be able to
download STEPmod or DEXlib for the purpose of viewing it only.
From now on only DEXlib will be discussed,
but the methodology is the same for STEPmod.
-
First you need to download, install and configure WinCVS.
This is explained in the software section about
WinCVS
.
With the proper settings, the download of the DEXlib module is straight-forward.
- Start the WinCVS application
-
Make sure that the folder ABOVE your STEPmod or DEXlib root folder
is selected in the tree-view window before beginning the download.
There are two different ways of doing the actual downloading of a CVS module.
The first time a 'check out' must be performed.
When this first download is completed,
two methods can be used to keep the module (i.e. DEXlib or STEPmod) up to date.
Either you perform a new check out each time, or you do a 'update'.
-
The first time 'check out' is done by...
When this first download is completed,
two methods can be used to keep the module (i.e. DEXlib or STEPmod) up to date.
Either you perform a new check out each time, or you do a 'update'.
-
An 'update' is done by...
Your first download will take quite some time depending on your connection to the Internet.
The following uppdates will be much quicker because only the changes to the module will be downloaded.
You are now ready to browse DEXlib.
If you're unsure on how to navigate the environment,
have a look at the section with
Navigation instructions
.
This section describes how CVS is set up to allow an user with developer status
(i.e. someone with rights to modify the contents)
to access DEXlib or STEPmod on Sourceforge.net.
- Go to, (https://sourceforge.net/account/register.php) and
follow the instructions given. You will be asked to choose a password and
enter a valid e-mail address, and then an account name, a display name, your
real name, your time-zone and then answer questions about optional e-mail
notifications.
- Keep a record of your chosen account name and password in a safe place.
-
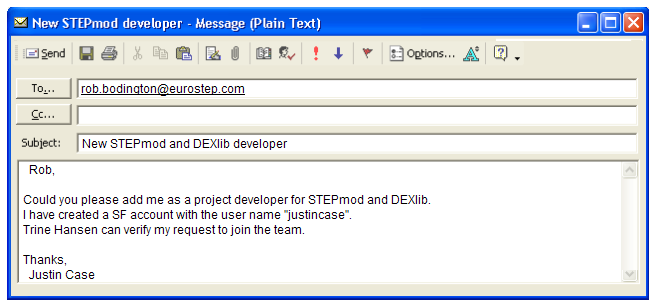
Email Rob Bodington (rob.bodington(at)eurostep.com),
Tom Hendrix, (thomas.e.hendrix(at)boeing.com) or
Chris Kreiler (kreilerc(at)mantech-wva.com)
and request developer status.
Remember to include your SF.net account name and a reference to an
existing developer who may verify your request to join the team.
Figure 1 — An example e-mail.
- Wait for a confirmation.
-
In order to create a safe connection to Sourceforge.net you need to download
an authentication software suite named PuTTY.
Read more in the software section about PuTTY.
-
After the download, you need to use the PuTTYgen application to generate authentication keys.
How this is done is explained
here
.
- Visit, (http://sourceforge.net/account/) and log in to your
personal account, using your Sourcforge.net account name and password.
- Click on the [Account Options] link in the top menu to access the
'Account Maintenance' page.
- Scroll down and click on the link [Edit SSH Keys for Shell/CVS].
- Open your private key file with the Puttygen application.
You will be asked for the password you chose during creation.
- Copy the numerals in the 'Public key for pasting into OpenSSH authorized_keys file' box,
by selecting them with your mouse and press Ctrl+C.
- Paste the line into the 'Authorized keys:' box on the page at the Sourceforge.net website,
which loaded when you clicked on the [Edit SSH Keys for Shell/CVS] link.
- Click on the 'Update' button to add the key. You will be sent back to the 'Account
Maintenance' page.
- Wait for the key to be synchronized to the project.
There is up to a 10 minute delay between the time SSH keys are uploaded on the
SourceForge.net site until they are synchronized to the project shell and CVS servers.
If you again click on the link [Edit SSH Keys for Shell/CVS] you can check if
your copied string contains any errors (shown by red text). The key string
should not be broken into several lines!
-
The next step is to set up PuTTY.
It is explained in the software section for
PuTTY
.
-
The last step is to test the PuTTY connection.
It is explained in the software section for
PuTTY
.
-
WinCVS is a graphical front-end for CVS.
How to download, install and setup WinCVS is explained
in the software section for
WinCVS
.
Your computer should now be correctly set up to allow you to access STEPmod and DEXlib.
If you encounter problems or would like to suggest improvements to this guide, please
contact any of the DEXlib developers listed on Sourceforge.net. A guide on how to
download STEPmod and DEXlib is found
here.