| Help TOC > Instructions for DEX developers > Software > WinCVS
|
| WinCVS |
Date: 2008/02/26 10:50:31
Revision: 1.14
|
WinCVS is a graphical front end tool for accessing CVS repositories.
It runs on the Microsoft Windows platform.
WinCvs is an advanced CVS client that provides an expert level of control over CVS operations.
Below, descriptions for two different versions of WinCVS is provided.
CVS, Concurrent Versions System, is a centralized Revision Control System (RCS).
SourceForge.net provides CVS service to all hosted projects.
In order to access the CVS service, a CVS client (like WinCVS) is needed.
CVS allows developers to keep a historical record of changes made to their source code tree,
and to allow multiple developers to work on a single set of files at the same time
without accidentally overwriting changes made by other developers.
Sourceforge CVS does not work as an ordinary CAD system where you check out a file,
modify it, and checks it back in for others to modify.
In Sourceforge CVS, files are never being checked out.
Instead the CVS system allows concurrent editing.
This means that if two different users edit the same file at the same time,
a conflict will occur when the second file is being uploaded ("committed").
If this happens, Sourceforge CVS returns a message notifying the user of the conflict,
and then merges the two new editions into one.
It's advised to look into this file afterwards because the merging process isn't always perfect.
When you check in changes to a file, Sourceforge CVS puts a lock on that file for the duration of the check in.
This is to prevent someone else checking in the file at the exact same time.
As soon as the CVS system has successfully committed the changes,
it removes the lock and allows others access to the file.
Sometimes the removal of the lock fails.
This stops others from accessing that file.
The message displayed by Sourceforge CVS when trying to access a locked file is shown below.
cvs checkout: Updating dexlib/data/dex/work_package_definition
cvs checkout: [11:43:42] waiting for tim's lock in /cvsroot/dexlib/dexlib/data/dex/work_package_definition
To remove the lock on a file you need administrator access to the CVS repository.
Therefore a support request must be sent to SourceForge.net team for assistance.
It could take a couple of days before the request is being addressed,
but given that SourceForge.net are supporting over 100,000 projects and over 1 million users
(https://sourceforge.net/docs/about)
with no costs, this waiting time must be considered reasonable.
Further useful information about WinCVS is found on
(http://www.thathost.com/wincvs-howto/)
If you'd like to know what the mystical letters shown during update mean, have a look at
(http://www.thathost.com/wincvs-howto/cvsdoc/cvs_16.html#SEC152).
The DEXlib source files are manged by the Sourceforge CVS.
There is an open browsable copy of DEXlib accessible on the web
(http://dexlib.cvs.sourceforge.net/dexlib/dexlib/).
Here you can view each individual file,
and also see its development over time (its different revisions)
and the change logs describing the difference between two revisions.
Be aware that it can take up to 24 hours before an update
to a CVS managed file is viewable in the browable copy!
A CVS id tag can be included in the documents.
This is achieved by adding;
to the code where ever the string is wanted.
The result will be something like;
<!-- $Id: sw_wincvs.xml,v 1.14 2008/02/26 10:50:31 mikeward Exp $ -->
This older version of WinCVS is still usable...
WinCVS is a graphical front-end for CVS (Concurrent Versions System).
CVS is an open-source version control system mainly used be software developers.
The instructions in step 9 below are written for version 1.3.13.2 of WinCVS.
The first three bullets describe how to download the most recent version of WinCVS.
If you wish to use the older 1.3.13.2 version, you can download it from (...here...),
and skip these first three bullets.
- Use your web browser to visit [http://www.wincvs.org/], and scroll down to the 'CvsGui
distribution' section.
- Click on the [binaries and source code] link, and scroll down to the 'Latest Recommended
Release: WinCvs 1.3.20.3 (released 2004-11-21)' section. If the release numbers and dates
are different doesn't matter.
- Click on the [Download installer] link, chose a download location by clicking on the
download icon. Save the zip-file to your hard drive.
- Extract the 'setup.exe' file from the 'WinCvs13b20-3.zip' file into the same folder. The
zip file may have another name depending on which version was the most recent when you
performed the download.
- Run the 'setup.exe' file and accept the default settings. Also accept to install CVSNT.
WinCVS should now be installed on your computer, and an icon (a yellow fish) should be
present on your desktop. (Install python?)
No setup guidence for non-developers is written for this version of WinCVS.
When the installation is completed and your computer has been restarted,
WinCVS needs to be configured for access to DEXlib or STEPmod.
These instructions for are valid for WinCvs 1.3.13.2.
-
Create a folder for all your STEPmod and DEXlib files. Note that the main folders "StepMod"
and "Dexlib" must both be placed on the same level in the catalog hierarchy,
otherwise links in DEXlib to STEPmod contents will not work properly.
- Start WinCVS.
- Open the 'Admin' menu and select 'Preferences...' (or use Ctrl+F1).
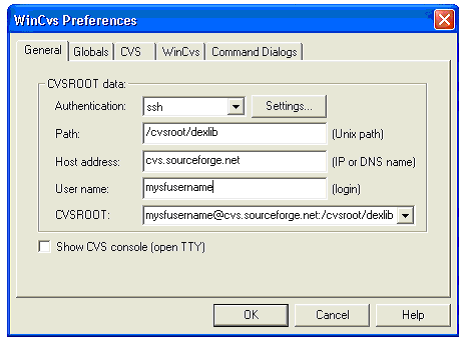
- Click on the 'General' tab to set general preferences.
Figure 1 — The 'General' preferences tab in WinCVS.
- Select "ssh" in the 'Authentication' field.
- Type "/cvsroot/dexlib" in the 'Path:' field.
- Type "cvs.sourceforge.net" in the 'Host address:' field,
or the name of your PuTTY sessesion, e.g. 'my_putty_session'.
- Type your SourceForge user name, e.g. 'my_sf_username'' in the 'User name:' field.
- Click on the 'Settings...' button next to the 'Authentication' field.
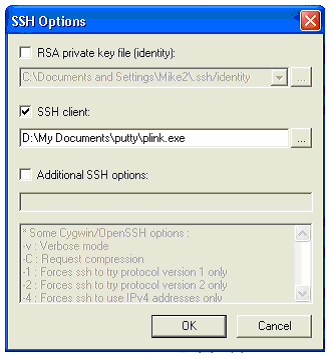
Figure 2 — The 'SSH Options' window.
- Check the 'SH client:' box.
- Click on the '...' button next to the SSH text input field.
- Browse to your "plink.exe" file, select it and click on the 'open' button.
- Click on the 'OK' button in the 'SSH Options' window.
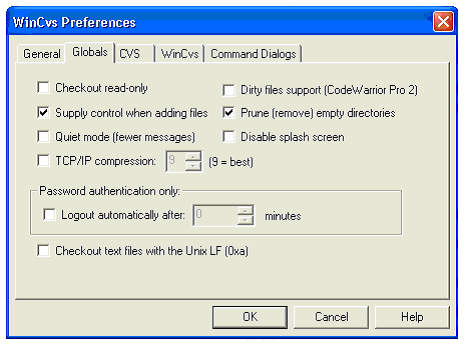
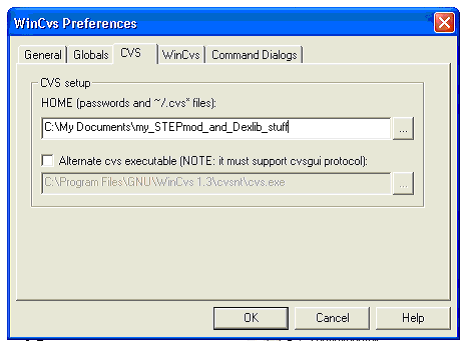
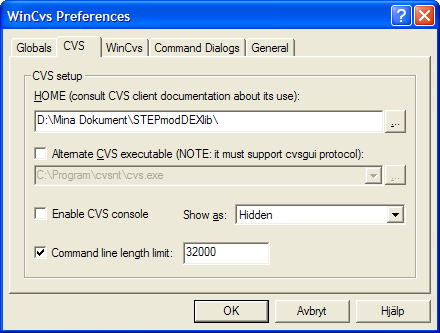
- Click on the 'CVS' tab to specify folder preferences.
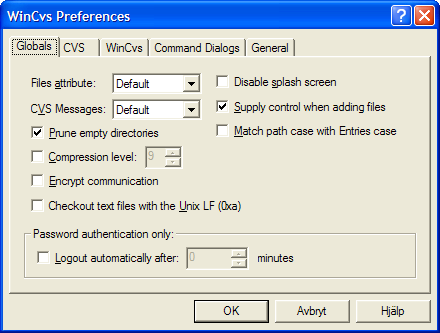
Figure 4 — The 'Globals' preferences tab in WinCVS.
- Click on the '...' button next to the 'HOME' text input field.
- Browse to your STEPmod and DEXlib folder that you created in the beginning of this step,
select it and click on the 'open' button.
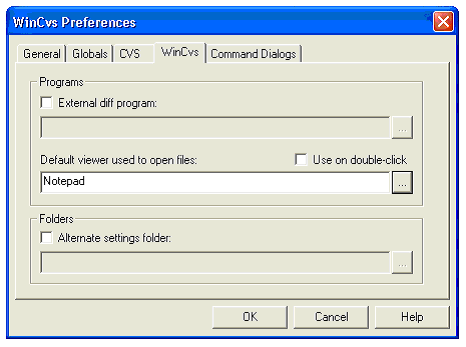
- Click on the 'WinCvs' tab to specify the file editor to be used.
Figure 5 — The 'WinCvs' preferences tab in WinCVS.
- Click on the '...' button next to the 'Default viewer used to open
files:' text input field.
- Browse to the file editor you wish to use when working in STEPmod or
DEXlib, select it and click on the 'open' button.
- Click on the 'OK' button in the 'WinCvs' preferences tab to save your settings
and exit the 'WinCvs Preferences' dialog.
WinCVS 2.0.2.4 was the latest available version at the time of this writing (2005-11-08).
This installation description has been copied from the Sorceforge.net document F05.
To install WinCvs, first read these instructions through, then do the following:
-
Download the latest stable release of WinCvs from the CvsGui project website
(https://sourceforge.net/projects/cvsgui/),
and unzip the downloaded file.
-
Run the WinCvs installer program extracted from the downloaded file, wincvs_setup.exe.
-
Close all other open programs except for the WinCvs installer and then click on the 'Next' button.
-
Read the license text if you are unfamiliar with it,
select the 'I accept the agreement' radio button and then click on the 'Next' button.
-
This screen displays useful information about the WinCvs applicaion.
It also provides details on optional Windows components that are required for certain users.
Once you have done so, click on the 'Next' button.
-
Review and alter the installation path for WinCvs if necessary.
The default path is the ideal location for most users.
Then, click on the 'Next' button.
-
Select the 'Full installation (recommended)' installation component pull-down
and click on the 'Next' button.
-
Review and alter the Start Menu folder to be created for WinCvs as needed
(the default option is recommended and shouldn't be changed for most users),
and click on the 'Next' button.
-
Modify any icon and shell context menu options as desired
(again, most users shouldn't have a need to modify these),
and click on the 'Next' button.
-
Review the selected installation options and then click on the 'Install' button if they are correct.
If not, go back and correct any incorrect settings.
-
Make sure the 'Install CVSNT' option is checked and click on the 'Finish' button.
-
Click on the 'Next' button.
-
Review the license agreement (the GNU GPL) and then select the 'I accept the agreement' radio button.
Then, click on the 'Next' button to continue.
-
Review and alter the installation path for cvsnt if necessary.
The default path is the ideal location for most users.
Then, click on the 'Next' button.
-
If a warning box comes up,
notifying you that the folder exists where you are trying to install cvsnt,
select 'Yes', as you do want to overwrite it.
-
Select the 'Full installation' component method
(this is not the default, you will have to select the option from the pull-down menu),
then click on the 'Next' button.
-
Review and modify the Start Menu options for cvsnt
(the defaults should be fine for most users),
then click on the 'Next' button.
-
Make sure the 'Generate default certificate' option is checked and click on the 'Next' button.
-
Review the installation options and use the 'Back' button to fix any mistakes.
Then, click on the 'Install' button.
- Click on the 'Finish' button
-
You must restart the computer to start using WinCvs.
If you wish to use it now, select the 'Yes, restart the computer now' radio button. Otherwise,
select the 'No, I will restart the computer later' radio button,
and restart the computer before trying to configure WinCvs.
(Install python?)
When the installation is completed and your computer has been restarted,
WinCVS needs to setup for anonymous access to the prefererred CVS module, e.g. DEXlib or STEPmod.
Anonymous access will only allow you to download a module and view it,
not to take part in the development process.
If you instead is interested in becoming a developer,
have a look at the
Developers Information section.
-
Create a folder for all your STEPmod and DEXlib files. Note that the main folders "StepMod"
and "Dexlib" must both be placed on the same level in the catalog hierarchy,
otherwise links in DEXlib to STEPmod contents will not work properly.
- Start WinCVS.
- Open the 'Admin' menu and select 'Preferences...' (or use Ctrl+F1).
No setup guidence for developers is written for this version of WinCVS.
See the instructions written for
WinCVS 1.3.13.2
If you are using WinCVS 2.0.2.4 as a developer,
you're more than welcome to write a developer setup guidence document.